Back
Train LoRAs in ComfyUI!
Use FlowScale's ComfyUI Workspaces to build LoRA training workflows, and deploy these workflows as scalable APIs.
Aug 30, 2024


Imagine you're an AI artist or developer deeply immersed in creating stunning visuals using ComfyUI. You've honed your skills, but when it comes to training LoRAs (Low-Rank Adaptations) to customize models, the process pulls you out of your creative flow. Switching between platforms like Google Colab or wrestling with complex setups can be a real barrier.
What if you could streamline this process by training LoRAs directly within your FlowScale ComfyUI workspace? No more platform hopping, no more convoluted configurations—just a seamless experience that keeps you in your creative zone.
In this guide, we'll walk you through how to train LoRAs right inside FlowScale's ComfyUI environment. You'll learn how to deploy a tailored workflow, set up necessary environment variables, and even train your LoRAs via API. By the end, you'll have your custom LoRAs stored securely in your FlowScale volumes, ready to elevate your AI art generation whenever inspiration strikes.
Why Train LoRAs on FlowScale's ComfyUI Workspace?
Training LoRAs within FlowScale's ComfyUI workspace offers several advantages:
Seamless Integration: Stay within the ComfyUI environment you're already comfortable with.
Efficient Workflow: Eliminate the need to use external platforms like Google Colab.
Easy Model Management: Store and access your trained LoRAs directly from FlowScale volumes.
API Deployment: Deploy the training workflow as an API, enabling programmatic LoRA training.
Getting Started: Prerequisites
Before you begin, ensure you have the following:
FlowScale Account: An active account on FlowScale.
Configured Pod: A properly set up pod in FlowScale.
Required Models: Specific models uploaded to your private volume for LoRA training.
ComfyUI Workflow: A workflow tailored for LoRA training within ComfyUI.
AWS Account: With permissions to manage S3 buckets and IAM users.
Public AWS S3 Bucket: Where your trained LoRAs will be stored.
AWS Credentials:
AWS_S3_BUCKET_NAMEAWS_S3_ACCESS_KEY_IDAWS_S3_SECRET_ACCESS_KEYAWS_S3_REGION
Step 1: Set Up Your Pod in FlowScale
Create or Select a Pod:
Navigate to the Pods Tab:
Log in to FlowScale and go to the Pods section.
Create or Select a Pod:
Click on Create New Pod or choose an existing one suitable for your workflow.

FlowScale's pods are your computational workspaces, providing the resources needed for training models within ComfyUI.
Step 2: Add Required Models to Your Private Volume
To train LoRAs, you need specific models added to your FlowScale private volume.
Models to Upload:
flux1-dev-fp8.safetensorsDownload Link: flux1-dev-fp8.safetensors
Folder:
unet
t5xxl_fp8_e4m3fn.safetensorsDownload Link: t5xxl_fp8_e4m3fn.safetensors
Folder:
clip
clip_l.safetensorsDownload Link: clip_l.safetensors
Folder:
clip
ae.safetensorsDownload Link: ae.safetensors
Folder:
vae
Upload Steps:
Create Folders in Private Volume:
In FlowScale, navigate to your private volume.
Create folders named
unet,clip, andvae.
Upload Models:
Use the upload feature (triple-dot icon next to each folder) to upload the corresponding model files.
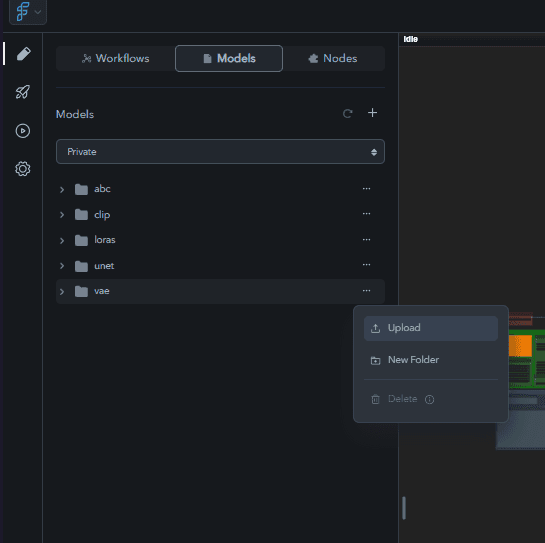
Confirm each upload to ensure the models are correctly added.

Organizing models in your private volume ensures they are readily accessible for your LoRA training workflow.
Step 3: Add Custom Nodes in FlowScale
To enhance your ComfyUI workflow for LoRA training:
Access the Nodes Tab:
Click on the Nodes tab in your FlowScale project.
Add Custom Node:
Click the + icon and select Add custom node.
Search and Add Node:
Search for rgthree.
Select rgthree's ComfyUI Node.
Click Save to add it to your project.
Custom nodes extend the functionality of ComfyUI, allowing for more specialized operations during training.
Step 4: Import the ComfyUI Workflow for LoRA Training
Download and Import Workflow:
Download Workflow Files:
Import into FlowScale:
Create a new folder named LoraTraining in your project.
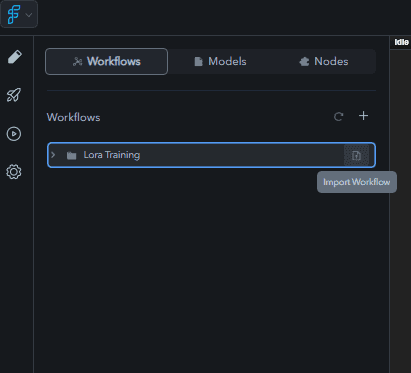
Click Import Workflow within this folder.
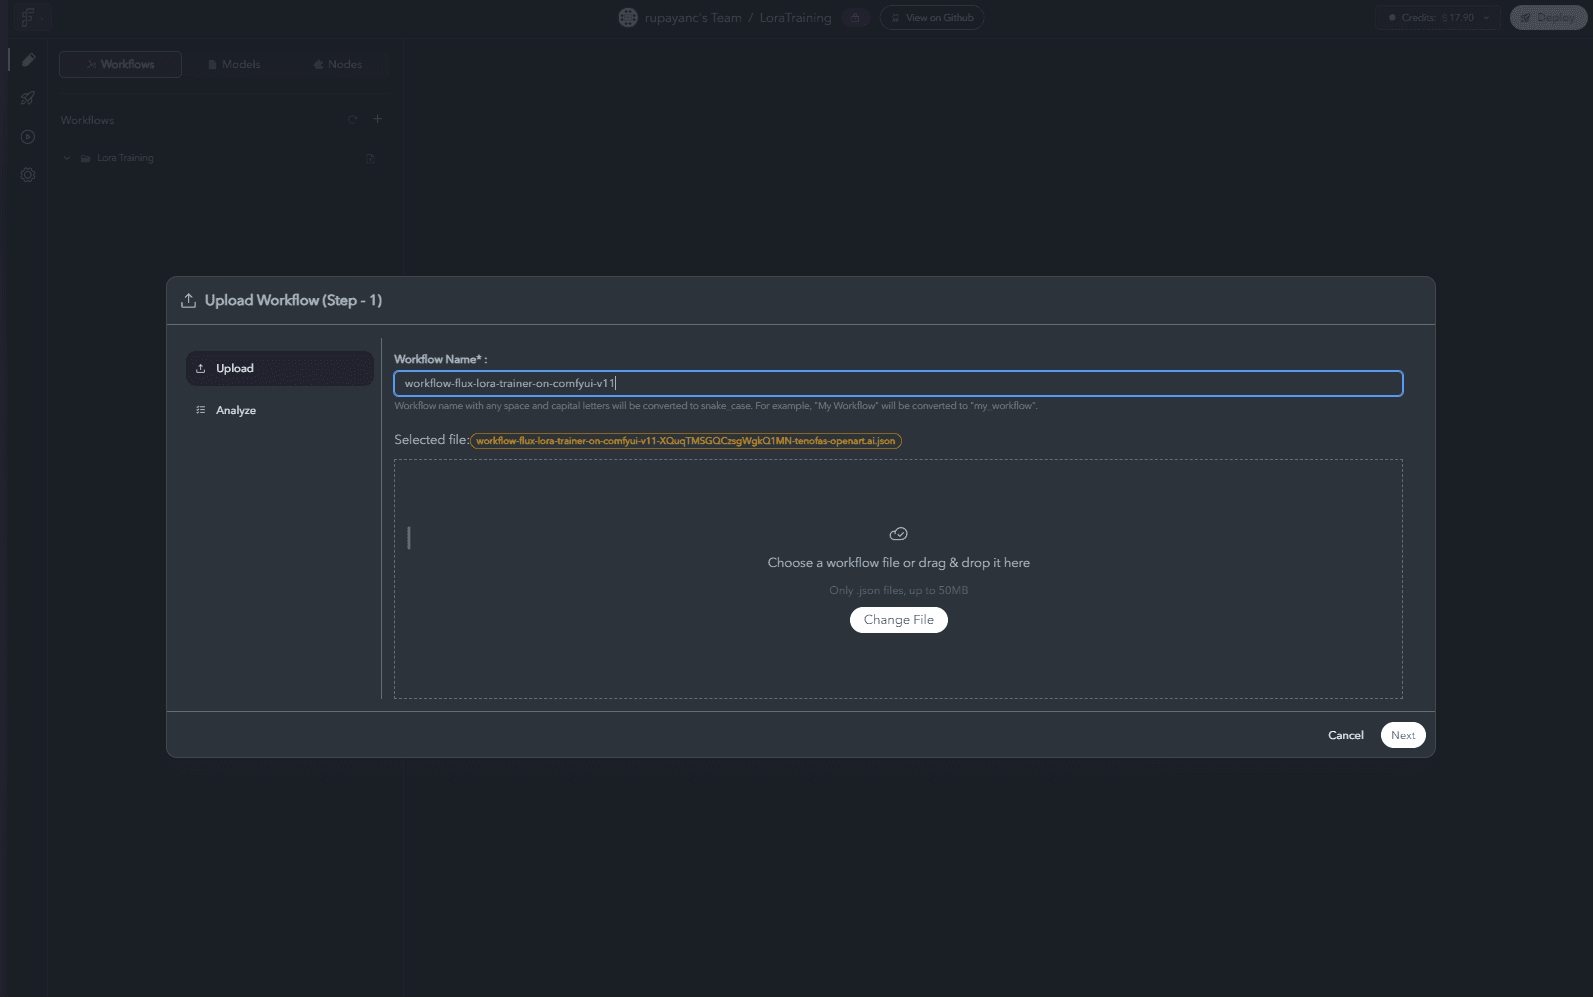
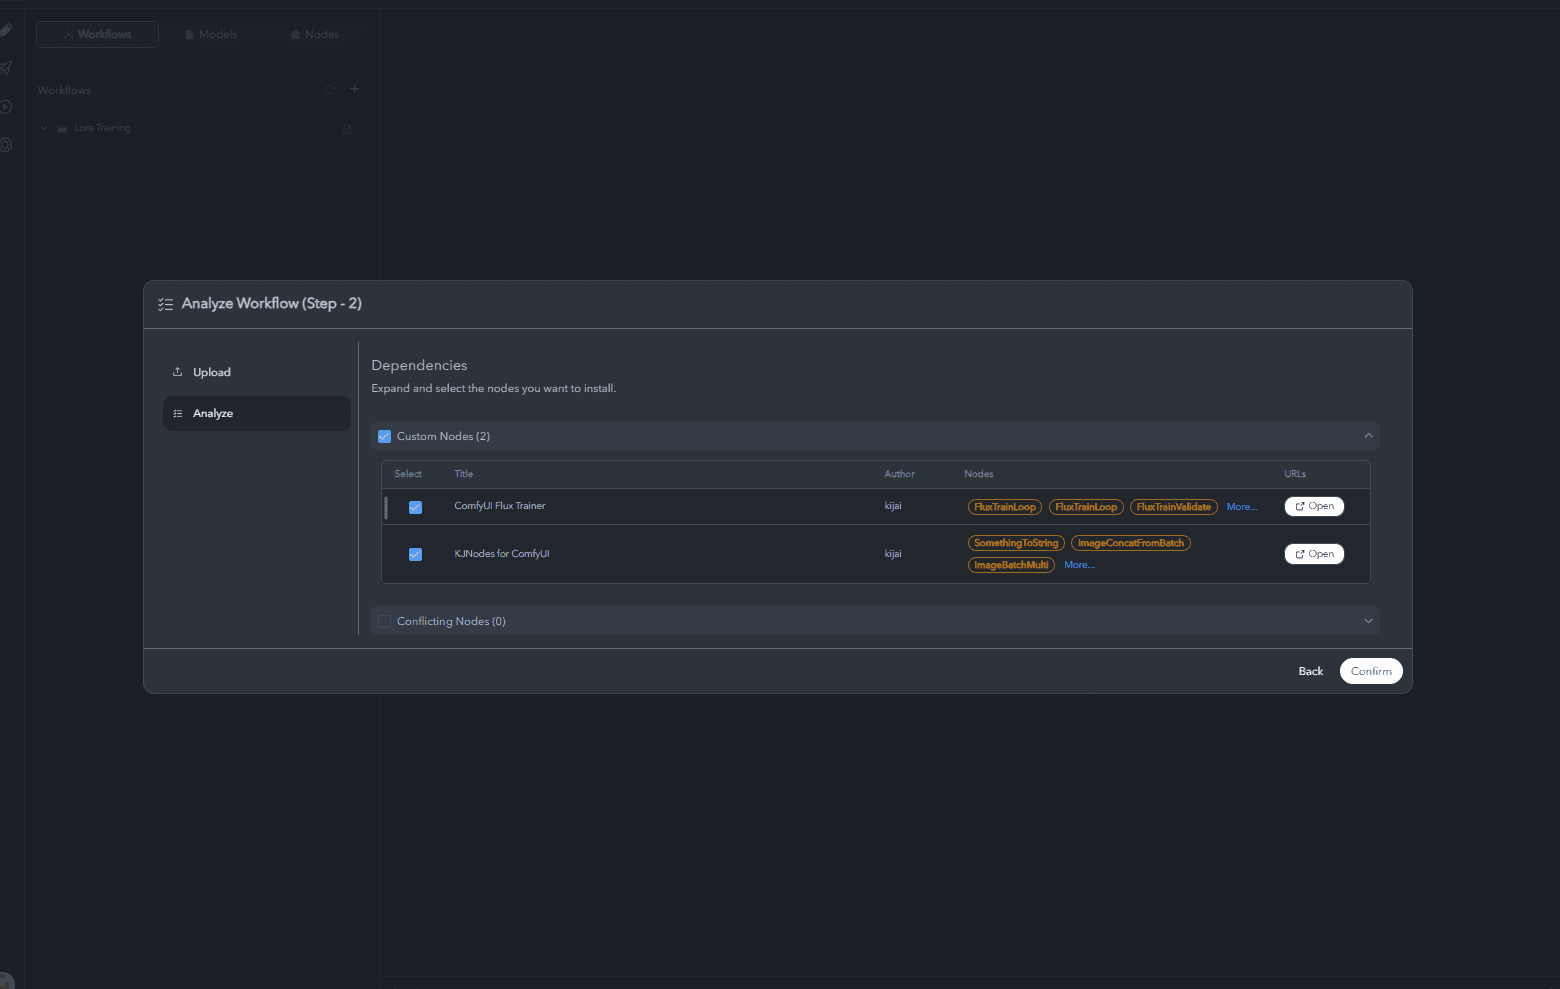
Select the downloaded workflow file.
Confirm the import to add it to your project.
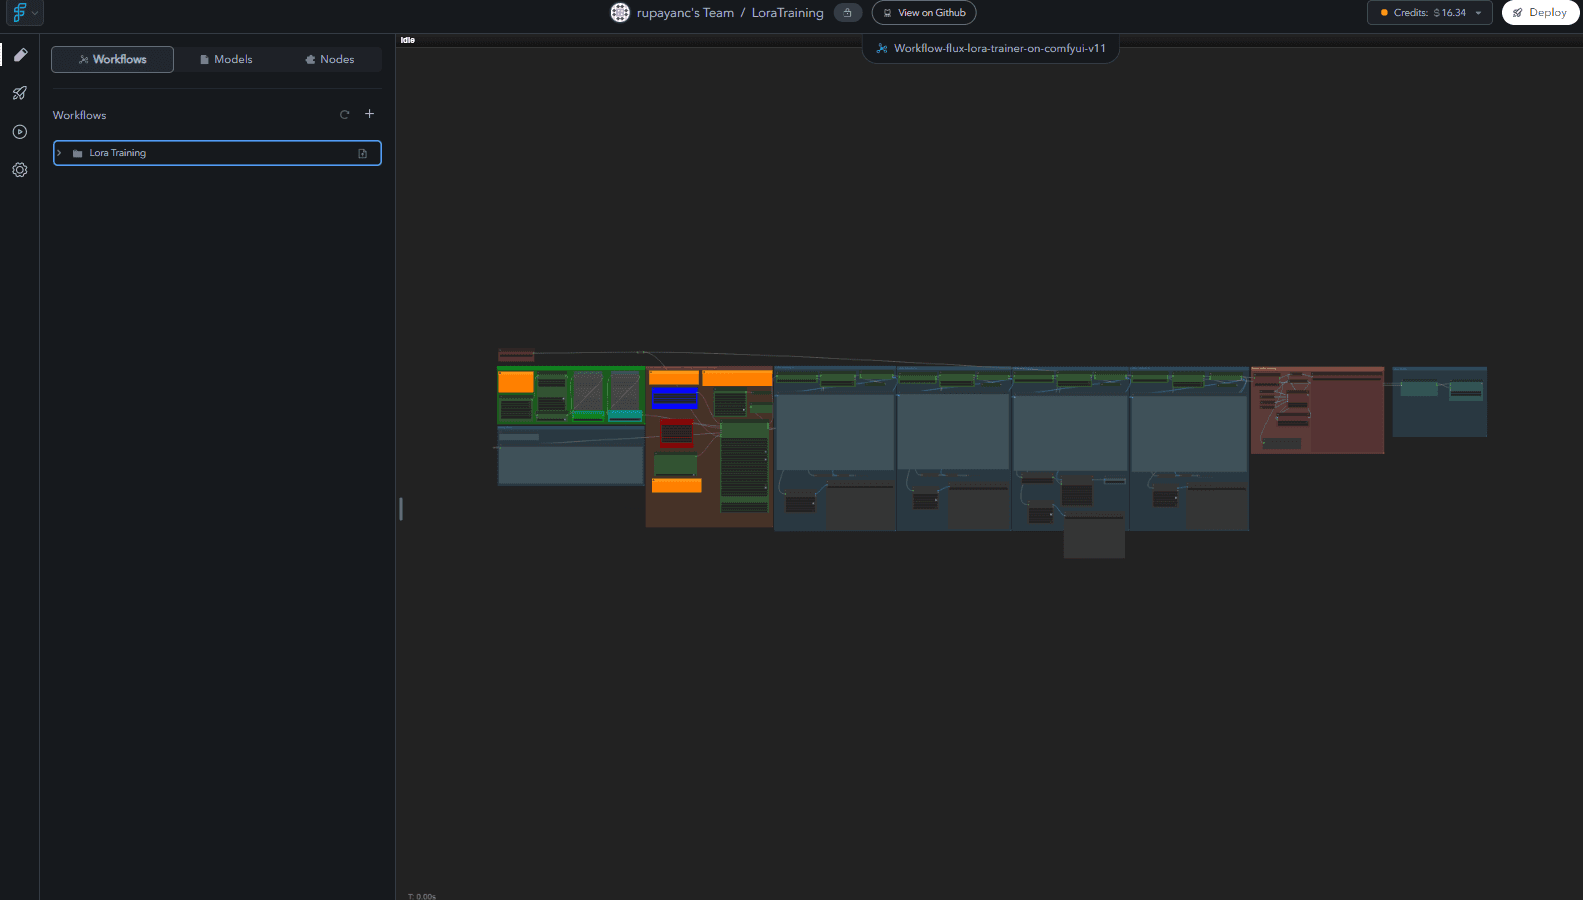
Having the workflow within your ComfyUI workspace means you can train LoRAs without leaving FlowScale.
Step 5: Configure AWS S3 Environment Variables
To store your trained LoRAs, you'll set up AWS S3 integration.
a. Create or Use an Existing S3 Bucket:
Access AWS S3:
Log in to your AWS account and navigate to S3 Services.
Create Bucket:
Click Create bucket.
Enter a unique Bucket name.
Important: Uncheck "Block all public access" to make the bucket public.

Complete the creation process.
b. Make the Bucket Public:
Set Bucket Policy:
In your bucket, go to the Permissions tab.
Add the following bucket policy (replace
your_bucket_namewith your actual bucket name):{ "Version": "2012-10-17", "Statement": [ { "Sid": "PublicReadGetObject", "Effect": "Allow", "Principal": "*", "Action": "s3:GetObject", "Resource": "arn:aws:s3:::your_bucket_name/*" } ] }
Set CORS Configuration:
[
  {
    "AllowedHeaders": ["*"],
    "AllowedMethods": ["GET", "PUT"],
    "AllowedOrigins": ["*"],
    "ExposeHeaders": []
  }
]
Making the bucket public allows FlowScale to store and retrieve your trained LoRAs.
c. Obtain AWS Credentials:
Create IAM User:
In AWS IAM, go to Users and click Add users.
Provide a user name and select Programmatic access.
Set Permissions:
Attach the AmazonS3FullAccess policy (for simplicity).
Save Credentials:
After creation, note down the Access Key ID and Secret Access Key.
d. Add Environment Variables in FlowScale:
Access Environment Settings:
In your FlowScale project, go to Settings > Environment Settings.
Add Variables:
AWS_S3_BUCKET_NAME- Your bucket nameAWS_S3_ACCESS_KEY_ID- Your Access Key IDAWS_S3_SECRET_ACCESS_KEY- Your Secret Access KeyAWS_S3_REGION- Your AWS region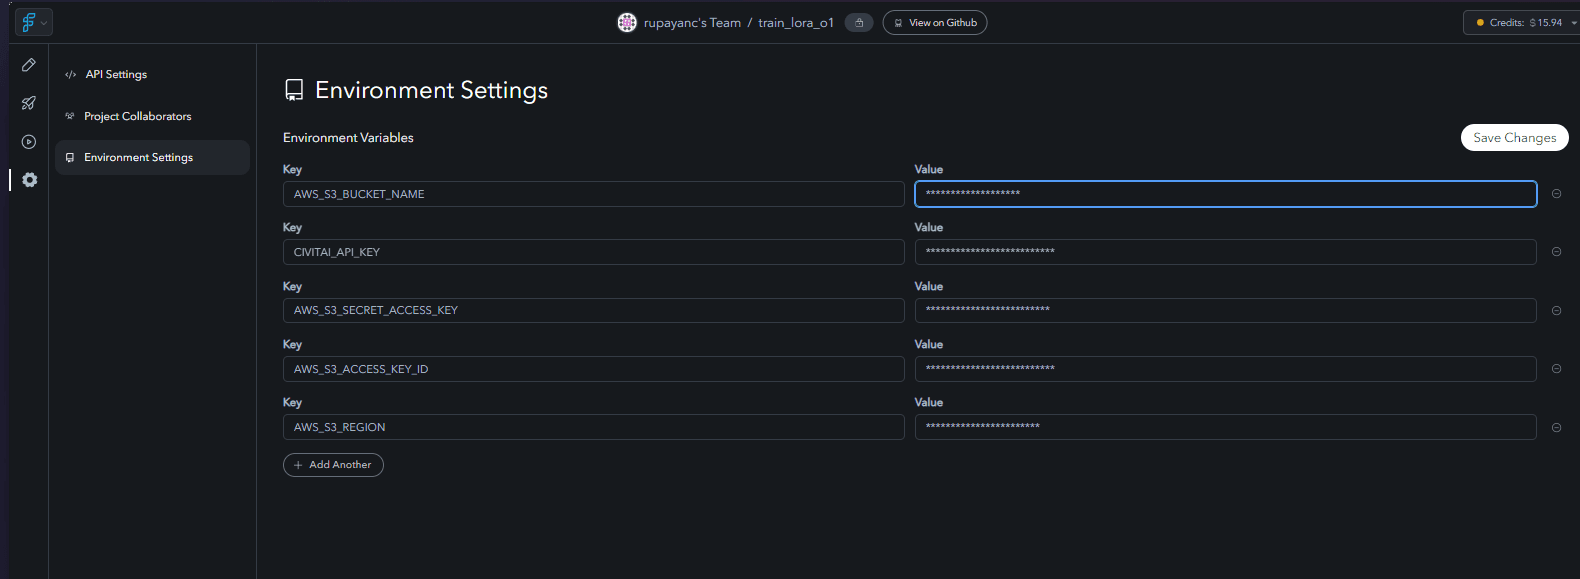
These variables enable your ComfyUI workflow to interact with your S3 bucket directly from FlowScale.
Step 6: Deploy the ComfyUI Workflow
Deploying your workflow allows you to run it within FlowScale and expose API endpoints if needed.
Prepare for Deployment:
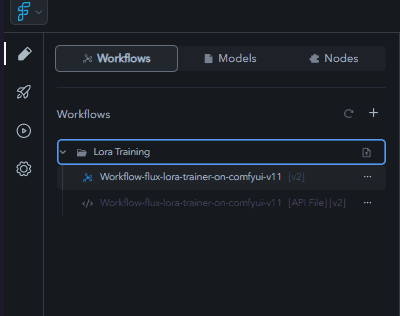
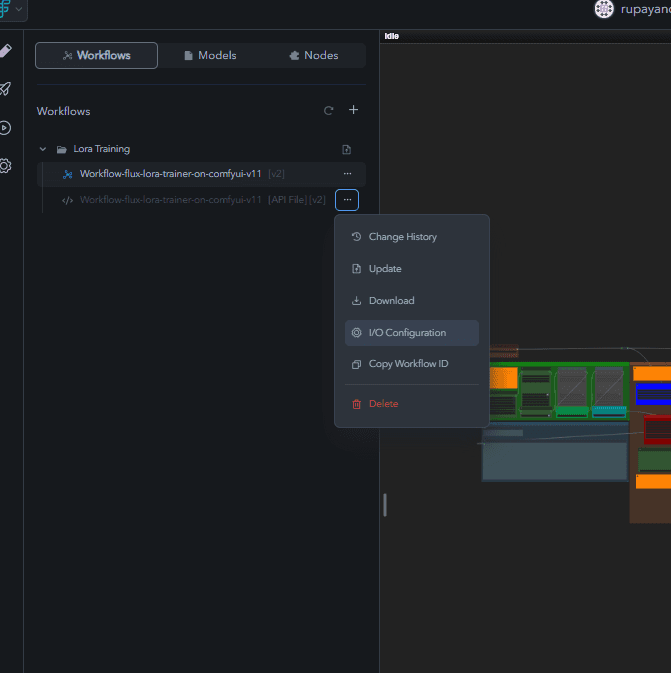
In your workflow, ensure all nodes are correctly configured.
Specifically, select the SaveModelToFlowscaleVolume node and save any changes.
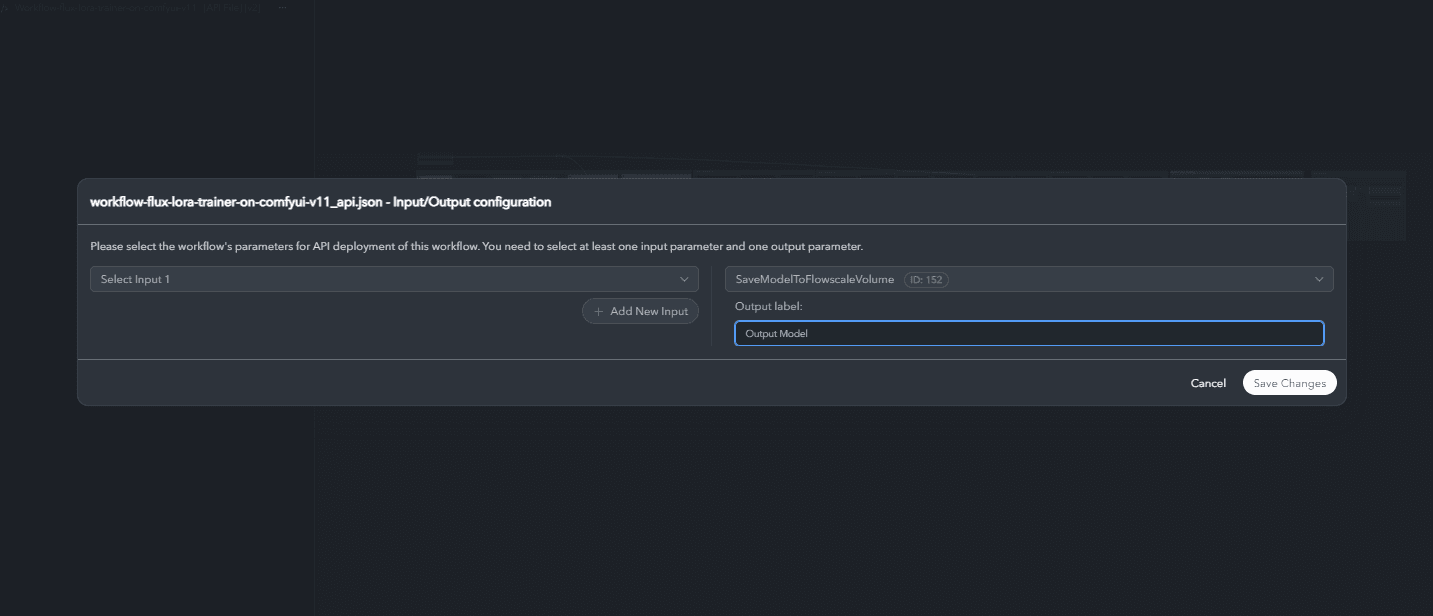
Deploy the Workflow:
Click the "Deploy" button on your project dashboard.
Select your pod and confirm the deployment.
Deployment Details:
After deployment, note the API URL, API Key, Workflow ID, and Workflow Execution Parameters.
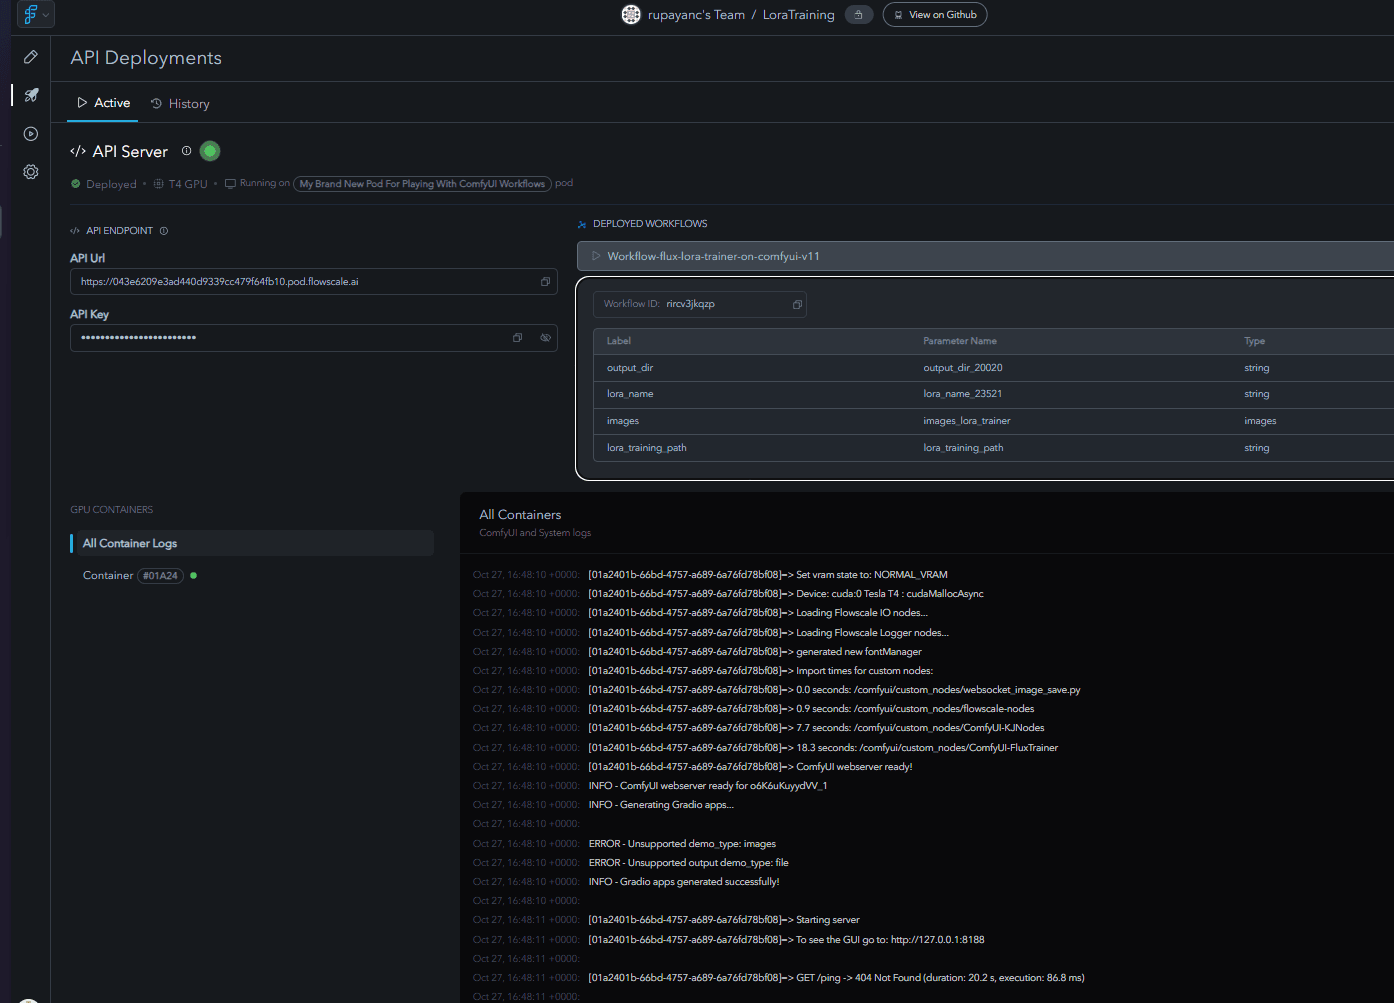
Deployment activates your workflow, making it ready for immediate use within your ComfyUI workspace or via API.
Step 7: Train Your LoRA Within FlowScale
Now, you're ready to train your LoRA directly inside FlowScale's ComfyUI workspace.
Option 1: Train via ComfyUI Interface
Open the Workflow:
Navigate to your LoraTraining folder and open the imported workflow.
Add Training Images:
Upload your training images within the ComfyUI interface.
Configure Parameters:
Set the
lora_nameand any other desired parameters.
Run the Workflow:
Execute the workflow to start training.
Monitor Progress:
Use FlowScale's interface to monitor the training process.
Option 2: Train via API
This enables programmatic training and integration with other applications.
Retrieve API Details:
From your deployment dashboard, copy the API URL and API Key.
Prepare API Request:
Endpoint URL: Use the provided API URL.
Headers:
X-API-Key: your_api_key
Content-Type: multipart/form-data
Form Data:
images_lora_trainer: Attach your training images.lora_name: Specify the name for your LoRA.
Execute API Call:
Use cURL or an API client like Postman to send the request.
Example using cURL:
curl --location 'https://your_api_url.pod.flowscale.ai/api/v1/runs?
  workflow_id=your_workflow_id&group_id=your_group_id' \
--header 'X-API-Key: your_api_key' \
--form 'images_lora_trainer=@/path/to/image1.jpg' \
--form 'images_lora_trainer=@/path/to/image2.jpg' \
--form 'lora_name=your_lora_name
Training via API allows for automation and integration into larger systems or applications.
Step 8: Access and Use Your Trained LoRA
a. Verify LoRA in FlowScale Volumes and S3 Bucket
In FlowScale:
Your trained LoRA is automatically saved in your FlowScale private volume.
In AWS S3:
Check your S3 bucket to confirm the LoRA file is uploaded.
b. Integrate LoRA into Your ComfyUI Workflows
Access the LoRA in ComfyUI:
In your ComfyUI workspace, the LoRA is available for use.
Use LoRA for AI Art Generation:
Reference the LoRA in your art generation workflows.
Continue creating with your custom-trained models without leaving FlowScale.
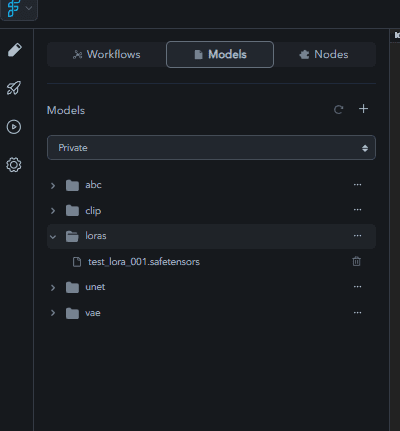
By keeping everything within FlowScale, you maintain a smooth and efficient workflow for your AI art projects.
Step 9: Explore API Deployment for LoRA Training
Deploying the training workflow as an API opens up new possibilities:
Automate Training Processes:
Integrate with other tools or scripts to automate LoRA training.
Remote Training Requests:
Allow collaborators or applications to trigger training without direct access to your workspace.
Scalability:
Manage multiple training sessions programmatically, scaling as needed.
API deployment enhances flexibility and integration capabilities for your LoRA training workflows.
Looking Ahead: Upcoming Features
Private Bucket Support:
Soon, you'll be able to use private S3 buckets for added security.
Enhanced Workflow Management:
Future updates will simplify workflow deployment and monitoring within FlowScale.
FlowScale is continuously improving to provide a better experience for ComfyUI users.
Troubleshooting Tips
Invalid API Key or URL:
Ensure you're using the correct details from your deployment dashboard.
AWS S3 Access Issues:
Verify that your AWS credentials and bucket policies are correctly configured.
Workflow Errors:
Double-check your ComfyUI workflow for any misconfigurations or missing nodes.
Training Failures:
Review logs and error messages within FlowScale to identify issues.
Most issues can be resolved by carefully reviewing configurations and ensuring all prerequisites are met.
Conclusion
By following this guide, you've:
Set up a pod and configured your FlowScale environment.
Added necessary models and custom nodes to your private volume.
Imported and deployed a ComfyUI workflow tailored for LoRA training.
Trained a LoRA directly within FlowScale's ComfyUI workspace.
Stored and accessed your custom LoRAs for AI art generation.
Explored API deployment for flexible training options.
You've streamlined your AI art creation process, eliminating the need for external platforms and keeping everything within the intuitive ComfyUI environment on FlowScale.
Additional Resources
FlowScale Documentation: docs.flowscale.ai
ComfyUI Resources: ComfyUI GitHub
AWS S3 Documentation: AWS S3 Docs
We're Here to Help
If you have any questions or need assistance, don't hesitate to reach out to our support team or join our community forums. Your feedback is invaluable in helping us enhance your experience.
Empower your AI artistry by training custom LoRAs directly within FlowScale's ComfyUI workspaces. Happy creating!
Imagine you're an AI artist or developer deeply immersed in creating stunning visuals using ComfyUI. You've honed your skills, but when it comes to training LoRAs (Low-Rank Adaptations) to customize models, the process pulls you out of your creative flow. Switching between platforms like Google Colab or wrestling with complex setups can be a real barrier.
What if you could streamline this process by training LoRAs directly within your FlowScale ComfyUI workspace? No more platform hopping, no more convoluted configurations—just a seamless experience that keeps you in your creative zone.
In this guide, we'll walk you through how to train LoRAs right inside FlowScale's ComfyUI environment. You'll learn how to deploy a tailored workflow, set up necessary environment variables, and even train your LoRAs via API. By the end, you'll have your custom LoRAs stored securely in your FlowScale volumes, ready to elevate your AI art generation whenever inspiration strikes.
Why Train LoRAs on FlowScale's ComfyUI Workspace?
Training LoRAs within FlowScale's ComfyUI workspace offers several advantages:
Seamless Integration: Stay within the ComfyUI environment you're already comfortable with.
Efficient Workflow: Eliminate the need to use external platforms like Google Colab.
Easy Model Management: Store and access your trained LoRAs directly from FlowScale volumes.
API Deployment: Deploy the training workflow as an API, enabling programmatic LoRA training.
Getting Started: Prerequisites
Before you begin, ensure you have the following:
FlowScale Account: An active account on FlowScale.
Configured Pod: A properly set up pod in FlowScale.
Required Models: Specific models uploaded to your private volume for LoRA training.
ComfyUI Workflow: A workflow tailored for LoRA training within ComfyUI.
AWS Account: With permissions to manage S3 buckets and IAM users.
Public AWS S3 Bucket: Where your trained LoRAs will be stored.
AWS Credentials:
AWS_S3_BUCKET_NAMEAWS_S3_ACCESS_KEY_IDAWS_S3_SECRET_ACCESS_KEYAWS_S3_REGION
Step 1: Set Up Your Pod in FlowScale
Create or Select a Pod:
Navigate to the Pods Tab:
Log in to FlowScale and go to the Pods section.
Create or Select a Pod:
Click on Create New Pod or choose an existing one suitable for your workflow.

FlowScale's pods are your computational workspaces, providing the resources needed for training models within ComfyUI.
Step 2: Add Required Models to Your Private Volume
To train LoRAs, you need specific models added to your FlowScale private volume.
Models to Upload:
flux1-dev-fp8.safetensorsDownload Link: flux1-dev-fp8.safetensors
Folder:
unet
t5xxl_fp8_e4m3fn.safetensorsDownload Link: t5xxl_fp8_e4m3fn.safetensors
Folder:
clip
clip_l.safetensorsDownload Link: clip_l.safetensors
Folder:
clip
ae.safetensorsDownload Link: ae.safetensors
Folder:
vae
Upload Steps:
Create Folders in Private Volume:
In FlowScale, navigate to your private volume.
Create folders named
unet,clip, andvae.
Upload Models:
Use the upload feature (triple-dot icon next to each folder) to upload the corresponding model files.

Confirm each upload to ensure the models are correctly added.

Organizing models in your private volume ensures they are readily accessible for your LoRA training workflow.
Step 3: Add Custom Nodes in FlowScale
To enhance your ComfyUI workflow for LoRA training:
Access the Nodes Tab:
Click on the Nodes tab in your FlowScale project.
Add Custom Node:
Click the + icon and select Add custom node.
Search and Add Node:
Search for rgthree.
Select rgthree's ComfyUI Node.
Click Save to add it to your project.
Custom nodes extend the functionality of ComfyUI, allowing for more specialized operations during training.
Step 4: Import the ComfyUI Workflow for LoRA Training
Download and Import Workflow:
Download Workflow Files:
Import into FlowScale:
Create a new folder named LoraTraining in your project.

Click Import Workflow within this folder.


Select the downloaded workflow file.
Confirm the import to add it to your project.

Having the workflow within your ComfyUI workspace means you can train LoRAs without leaving FlowScale.
Step 5: Configure AWS S3 Environment Variables
To store your trained LoRAs, you'll set up AWS S3 integration.
a. Create or Use an Existing S3 Bucket:
Access AWS S3:
Log in to your AWS account and navigate to S3 Services.
Create Bucket:
Click Create bucket.
Enter a unique Bucket name.
Important: Uncheck "Block all public access" to make the bucket public.

Complete the creation process.
b. Make the Bucket Public:
Set Bucket Policy:
In your bucket, go to the Permissions tab.
Add the following bucket policy (replace
your_bucket_namewith your actual bucket name):{ "Version": "2012-10-17", "Statement": [ { "Sid": "PublicReadGetObject", "Effect": "Allow", "Principal": "*", "Action": "s3:GetObject", "Resource": "arn:aws:s3:::your_bucket_name/*" } ] }
Set CORS Configuration:
[
  {
    "AllowedHeaders": ["*"],
    "AllowedMethods": ["GET", "PUT"],
    "AllowedOrigins": ["*"],
    "ExposeHeaders": []
  }
]
Making the bucket public allows FlowScale to store and retrieve your trained LoRAs.
c. Obtain AWS Credentials:
Create IAM User:
In AWS IAM, go to Users and click Add users.
Provide a user name and select Programmatic access.
Set Permissions:
Attach the AmazonS3FullAccess policy (for simplicity).
Save Credentials:
After creation, note down the Access Key ID and Secret Access Key.
d. Add Environment Variables in FlowScale:
Access Environment Settings:
In your FlowScale project, go to Settings > Environment Settings.
Add Variables:
AWS_S3_BUCKET_NAME- Your bucket nameAWS_S3_ACCESS_KEY_ID- Your Access Key IDAWS_S3_SECRET_ACCESS_KEY- Your Secret Access KeyAWS_S3_REGION- Your AWS region
These variables enable your ComfyUI workflow to interact with your S3 bucket directly from FlowScale.
Step 6: Deploy the ComfyUI Workflow
Deploying your workflow allows you to run it within FlowScale and expose API endpoints if needed.
Prepare for Deployment:
In your workflow, ensure all nodes are correctly configured.
Specifically, select the SaveModelToFlowscaleVolume node and save any changes.


Deploy the Workflow:
Click the "Deploy" button on your project dashboard.
Select your pod and confirm the deployment.
Deployment Details:
After deployment, note the API URL, API Key, Workflow ID, and Workflow Execution Parameters.

Deployment activates your workflow, making it ready for immediate use within your ComfyUI workspace or via API.
Step 7: Train Your LoRA Within FlowScale
Now, you're ready to train your LoRA directly inside FlowScale's ComfyUI workspace.
Option 1: Train via ComfyUI Interface
Open the Workflow:
Navigate to your LoraTraining folder and open the imported workflow.
Add Training Images:
Upload your training images within the ComfyUI interface.
Configure Parameters:
Set the
lora_nameand any other desired parameters.
Run the Workflow:
Execute the workflow to start training.
Monitor Progress:
Use FlowScale's interface to monitor the training process.
Option 2: Train via API
This enables programmatic training and integration with other applications.
Retrieve API Details:
From your deployment dashboard, copy the API URL and API Key.
Prepare API Request:
Endpoint URL: Use the provided API URL.
Headers:
X-API-Key: your_api_key
Content-Type: multipart/form-data
Form Data:
images_lora_trainer: Attach your training images.lora_name: Specify the name for your LoRA.
Execute API Call:
Use cURL or an API client like Postman to send the request.
Example using cURL:
curl --location 'https://your_api_url.pod.flowscale.ai/api/v1/runs?
  workflow_id=your_workflow_id&group_id=your_group_id' \
--header 'X-API-Key: your_api_key' \
--form 'images_lora_trainer=@/path/to/image1.jpg' \
--form 'images_lora_trainer=@/path/to/image2.jpg' \
--form 'lora_name=your_lora_name
Training via API allows for automation and integration into larger systems or applications.
Step 8: Access and Use Your Trained LoRA
a. Verify LoRA in FlowScale Volumes and S3 Bucket
In FlowScale:
Your trained LoRA is automatically saved in your FlowScale private volume.
In AWS S3:
Check your S3 bucket to confirm the LoRA file is uploaded.
b. Integrate LoRA into Your ComfyUI Workflows
Access the LoRA in ComfyUI:
In your ComfyUI workspace, the LoRA is available for use.
Use LoRA for AI Art Generation:
Reference the LoRA in your art generation workflows.
Continue creating with your custom-trained models without leaving FlowScale.

By keeping everything within FlowScale, you maintain a smooth and efficient workflow for your AI art projects.
Step 9: Explore API Deployment for LoRA Training
Deploying the training workflow as an API opens up new possibilities:
Automate Training Processes:
Integrate with other tools or scripts to automate LoRA training.
Remote Training Requests:
Allow collaborators or applications to trigger training without direct access to your workspace.
Scalability:
Manage multiple training sessions programmatically, scaling as needed.
API deployment enhances flexibility and integration capabilities for your LoRA training workflows.
Looking Ahead: Upcoming Features
Private Bucket Support:
Soon, you'll be able to use private S3 buckets for added security.
Enhanced Workflow Management:
Future updates will simplify workflow deployment and monitoring within FlowScale.
FlowScale is continuously improving to provide a better experience for ComfyUI users.
Troubleshooting Tips
Invalid API Key or URL:
Ensure you're using the correct details from your deployment dashboard.
AWS S3 Access Issues:
Verify that your AWS credentials and bucket policies are correctly configured.
Workflow Errors:
Double-check your ComfyUI workflow for any misconfigurations or missing nodes.
Training Failures:
Review logs and error messages within FlowScale to identify issues.
Most issues can be resolved by carefully reviewing configurations and ensuring all prerequisites are met.
Conclusion
By following this guide, you've:
Set up a pod and configured your FlowScale environment.
Added necessary models and custom nodes to your private volume.
Imported and deployed a ComfyUI workflow tailored for LoRA training.
Trained a LoRA directly within FlowScale's ComfyUI workspace.
Stored and accessed your custom LoRAs for AI art generation.
Explored API deployment for flexible training options.
You've streamlined your AI art creation process, eliminating the need for external platforms and keeping everything within the intuitive ComfyUI environment on FlowScale.
Additional Resources
FlowScale Documentation: docs.flowscale.ai
ComfyUI Resources: ComfyUI GitHub
AWS S3 Documentation: AWS S3 Docs
We're Here to Help
If you have any questions or need assistance, don't hesitate to reach out to our support team or join our community forums. Your feedback is invaluable in helping us enhance your experience.
Empower your AI artistry by training custom LoRAs directly within FlowScale's ComfyUI workspaces. Happy creating!
Imagine you're an AI artist or developer deeply immersed in creating stunning visuals using ComfyUI. You've honed your skills, but when it comes to training LoRAs (Low-Rank Adaptations) to customize models, the process pulls you out of your creative flow. Switching between platforms like Google Colab or wrestling with complex setups can be a real barrier.
What if you could streamline this process by training LoRAs directly within your FlowScale ComfyUI workspace? No more platform hopping, no more convoluted configurations—just a seamless experience that keeps you in your creative zone.
In this guide, we'll walk you through how to train LoRAs right inside FlowScale's ComfyUI environment. You'll learn how to deploy a tailored workflow, set up necessary environment variables, and even train your LoRAs via API. By the end, you'll have your custom LoRAs stored securely in your FlowScale volumes, ready to elevate your AI art generation whenever inspiration strikes.
Why Train LoRAs on FlowScale's ComfyUI Workspace?
Training LoRAs within FlowScale's ComfyUI workspace offers several advantages:
Seamless Integration: Stay within the ComfyUI environment you're already comfortable with.
Efficient Workflow: Eliminate the need to use external platforms like Google Colab.
Easy Model Management: Store and access your trained LoRAs directly from FlowScale volumes.
API Deployment: Deploy the training workflow as an API, enabling programmatic LoRA training.
Getting Started: Prerequisites
Before you begin, ensure you have the following:
FlowScale Account: An active account on FlowScale.
Configured Pod: A properly set up pod in FlowScale.
Required Models: Specific models uploaded to your private volume for LoRA training.
ComfyUI Workflow: A workflow tailored for LoRA training within ComfyUI.
AWS Account: With permissions to manage S3 buckets and IAM users.
Public AWS S3 Bucket: Where your trained LoRAs will be stored.
AWS Credentials:
AWS_S3_BUCKET_NAMEAWS_S3_ACCESS_KEY_IDAWS_S3_SECRET_ACCESS_KEYAWS_S3_REGION
Step 1: Set Up Your Pod in FlowScale
Create or Select a Pod:
Navigate to the Pods Tab:
Log in to FlowScale and go to the Pods section.
Create or Select a Pod:
Click on Create New Pod or choose an existing one suitable for your workflow.

FlowScale's pods are your computational workspaces, providing the resources needed for training models within ComfyUI.
Step 2: Add Required Models to Your Private Volume
To train LoRAs, you need specific models added to your FlowScale private volume.
Models to Upload:
flux1-dev-fp8.safetensorsDownload Link: flux1-dev-fp8.safetensors
Folder:
unet
t5xxl_fp8_e4m3fn.safetensorsDownload Link: t5xxl_fp8_e4m3fn.safetensors
Folder:
clip
clip_l.safetensorsDownload Link: clip_l.safetensors
Folder:
clip
ae.safetensorsDownload Link: ae.safetensors
Folder:
vae
Upload Steps:
Create Folders in Private Volume:
In FlowScale, navigate to your private volume.
Create folders named
unet,clip, andvae.
Upload Models:
Use the upload feature (triple-dot icon next to each folder) to upload the corresponding model files.

Confirm each upload to ensure the models are correctly added.

Organizing models in your private volume ensures they are readily accessible for your LoRA training workflow.
Step 3: Add Custom Nodes in FlowScale
To enhance your ComfyUI workflow for LoRA training:
Access the Nodes Tab:
Click on the Nodes tab in your FlowScale project.
Add Custom Node:
Click the + icon and select Add custom node.
Search and Add Node:
Search for rgthree.
Select rgthree's ComfyUI Node.
Click Save to add it to your project.
Custom nodes extend the functionality of ComfyUI, allowing for more specialized operations during training.
Step 4: Import the ComfyUI Workflow for LoRA Training
Download and Import Workflow:
Download Workflow Files:
Import into FlowScale:
Create a new folder named LoraTraining in your project.

Click Import Workflow within this folder.


Select the downloaded workflow file.
Confirm the import to add it to your project.

Having the workflow within your ComfyUI workspace means you can train LoRAs without leaving FlowScale.
Step 5: Configure AWS S3 Environment Variables
To store your trained LoRAs, you'll set up AWS S3 integration.
a. Create or Use an Existing S3 Bucket:
Access AWS S3:
Log in to your AWS account and navigate to S3 Services.
Create Bucket:
Click Create bucket.
Enter a unique Bucket name.
Important: Uncheck "Block all public access" to make the bucket public.

Complete the creation process.
b. Make the Bucket Public:
Set Bucket Policy:
In your bucket, go to the Permissions tab.
Add the following bucket policy (replace
your_bucket_namewith your actual bucket name):{ "Version": "2012-10-17", "Statement": [ { "Sid": "PublicReadGetObject", "Effect": "Allow", "Principal": "*", "Action": "s3:GetObject", "Resource": "arn:aws:s3:::your_bucket_name/*" } ] }
Set CORS Configuration:
[
  {
    "AllowedHeaders": ["*"],
    "AllowedMethods": ["GET", "PUT"],
    "AllowedOrigins": ["*"],
    "ExposeHeaders": []
  }
]
Making the bucket public allows FlowScale to store and retrieve your trained LoRAs.
c. Obtain AWS Credentials:
Create IAM User:
In AWS IAM, go to Users and click Add users.
Provide a user name and select Programmatic access.
Set Permissions:
Attach the AmazonS3FullAccess policy (for simplicity).
Save Credentials:
After creation, note down the Access Key ID and Secret Access Key.
d. Add Environment Variables in FlowScale:
Access Environment Settings:
In your FlowScale project, go to Settings > Environment Settings.
Add Variables:
AWS_S3_BUCKET_NAME- Your bucket nameAWS_S3_ACCESS_KEY_ID- Your Access Key IDAWS_S3_SECRET_ACCESS_KEY- Your Secret Access KeyAWS_S3_REGION- Your AWS region
These variables enable your ComfyUI workflow to interact with your S3 bucket directly from FlowScale.
Step 6: Deploy the ComfyUI Workflow
Deploying your workflow allows you to run it within FlowScale and expose API endpoints if needed.
Prepare for Deployment:
In your workflow, ensure all nodes are correctly configured.
Specifically, select the SaveModelToFlowscaleVolume node and save any changes.


Deploy the Workflow:
Click the "Deploy" button on your project dashboard.
Select your pod and confirm the deployment.
Deployment Details:
After deployment, note the API URL, API Key, Workflow ID, and Workflow Execution Parameters.

Deployment activates your workflow, making it ready for immediate use within your ComfyUI workspace or via API.
Step 7: Train Your LoRA Within FlowScale
Now, you're ready to train your LoRA directly inside FlowScale's ComfyUI workspace.
Option 1: Train via ComfyUI Interface
Open the Workflow:
Navigate to your LoraTraining folder and open the imported workflow.
Add Training Images:
Upload your training images within the ComfyUI interface.
Configure Parameters:
Set the
lora_nameand any other desired parameters.
Run the Workflow:
Execute the workflow to start training.
Monitor Progress:
Use FlowScale's interface to monitor the training process.
Option 2: Train via API
This enables programmatic training and integration with other applications.
Retrieve API Details:
From your deployment dashboard, copy the API URL and API Key.
Prepare API Request:
Endpoint URL: Use the provided API URL.
Headers:
X-API-Key: your_api_key
Content-Type: multipart/form-data
Form Data:
images_lora_trainer: Attach your training images.lora_name: Specify the name for your LoRA.
Execute API Call:
Use cURL or an API client like Postman to send the request.
Example using cURL:
curl --location 'https://your_api_url.pod.flowscale.ai/api/v1/runs?
  workflow_id=your_workflow_id&group_id=your_group_id' \
--header 'X-API-Key: your_api_key' \
--form 'images_lora_trainer=@/path/to/image1.jpg' \
--form 'images_lora_trainer=@/path/to/image2.jpg' \
--form 'lora_name=your_lora_name
Training via API allows for automation and integration into larger systems or applications.
Step 8: Access and Use Your Trained LoRA
a. Verify LoRA in FlowScale Volumes and S3 Bucket
In FlowScale:
Your trained LoRA is automatically saved in your FlowScale private volume.
In AWS S3:
Check your S3 bucket to confirm the LoRA file is uploaded.
b. Integrate LoRA into Your ComfyUI Workflows
Access the LoRA in ComfyUI:
In your ComfyUI workspace, the LoRA is available for use.
Use LoRA for AI Art Generation:
Reference the LoRA in your art generation workflows.
Continue creating with your custom-trained models without leaving FlowScale.

By keeping everything within FlowScale, you maintain a smooth and efficient workflow for your AI art projects.
Step 9: Explore API Deployment for LoRA Training
Deploying the training workflow as an API opens up new possibilities:
Automate Training Processes:
Integrate with other tools or scripts to automate LoRA training.
Remote Training Requests:
Allow collaborators or applications to trigger training without direct access to your workspace.
Scalability:
Manage multiple training sessions programmatically, scaling as needed.
API deployment enhances flexibility and integration capabilities for your LoRA training workflows.
Looking Ahead: Upcoming Features
Private Bucket Support:
Soon, you'll be able to use private S3 buckets for added security.
Enhanced Workflow Management:
Future updates will simplify workflow deployment and monitoring within FlowScale.
FlowScale is continuously improving to provide a better experience for ComfyUI users.
Troubleshooting Tips
Invalid API Key or URL:
Ensure you're using the correct details from your deployment dashboard.
AWS S3 Access Issues:
Verify that your AWS credentials and bucket policies are correctly configured.
Workflow Errors:
Double-check your ComfyUI workflow for any misconfigurations or missing nodes.
Training Failures:
Review logs and error messages within FlowScale to identify issues.
Most issues can be resolved by carefully reviewing configurations and ensuring all prerequisites are met.
Conclusion
By following this guide, you've:
Set up a pod and configured your FlowScale environment.
Added necessary models and custom nodes to your private volume.
Imported and deployed a ComfyUI workflow tailored for LoRA training.
Trained a LoRA directly within FlowScale's ComfyUI workspace.
Stored and accessed your custom LoRAs for AI art generation.
Explored API deployment for flexible training options.
You've streamlined your AI art creation process, eliminating the need for external platforms and keeping everything within the intuitive ComfyUI environment on FlowScale.
Additional Resources
FlowScale Documentation: docs.flowscale.ai
ComfyUI Resources: ComfyUI GitHub
AWS S3 Documentation: AWS S3 Docs
We're Here to Help
If you have any questions or need assistance, don't hesitate to reach out to our support team or join our community forums. Your feedback is invaluable in helping us enhance your experience.
Empower your AI artistry by training custom LoRAs directly within FlowScale's ComfyUI workspaces. Happy creating!

Rupayan Chakraborty
Other articles you might like
Deep dive into the world of GenAI, and it's usecases